Thursday, February 11, 2016

Introducing Inverse Trig Functions


So I've been reading a bit about inverse trig functions on line and how people approach teaching them. It got me thinking about what my focus is with inverse trig functions and inverse functions in general in PreCalculus. My thinking is that students in Algebra 2 learn about inverse functions and the mechanics of inverse functions (how to create graphs, how to create inverse function equations, what they mean in terms of real life situations). PreCalculus is a time to dissect the idea of inverse functions more deeply in a bit of a more theoretical way. Are there limitations to the inverses of functions? Is every inverse of a function a function itself? We explored these questions back in the fall and it was hard for students. I have a good set of classes, honors level but they have been used to learning processes and procedures and not really developing a deeper understanding.

I like to start out these lessons on inverse trig functions by having a discussion about the difference between inverse operations and inverse functions.  This sort of maps out our discussion (I lead the discussion with questions - what is an operation? what is the inverse of that operation? Let's consider an operation we all know pretty well - "squaring" - what does that look like as an operation? as a function? as an inverse operation? as an inverse operation?).

Then I steer the discussion to trig ratios as operations, as functions, etc. I try to do this by asking as many questions as possible.

Then after the discussion I distribute an "explore" packet to students. We do the first page together (it's just a review of inverses with quadratics and the domain & range restrictions). Then students work together in their small groups and using their graphing calculators work on visually representing  and defining domains and ranges of inverse trig functions.  I put a big focus on the visual (it's how I learn best and I find students often learn better that way too),

I thought I'd visually go through what we do & students do with the explore packet. You can open a blank electronic version of this worksheet at the end of the post.

We use TI-84 or TI-83 graphing calculators. We graph a basic quadratic and state the domain & range:
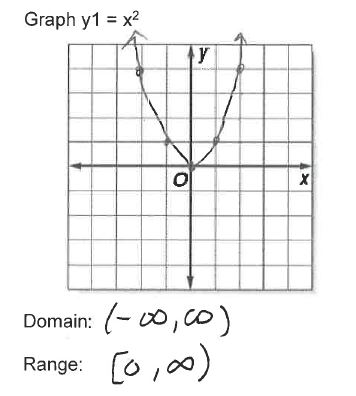

Then using the DRAW menu we can actually see the true inverse without restrictions of this function. We do that and draw it. Discussion ensues with "what's wrong with this picture?"

From there we remember that the inverse of the quadratic is the square root function. We draw that. We carefully examine the graph and the function equation to be clear about the domain and range. 

A little "mantra' we chant is the the domain of the inverse comes from the range of the original. This is verified and we see how it restricts the range. All this is review of something we did back in the fall.

Now students get to work on their own doing a similar process to sine, cosine and tangent. These bits below show ideally what they should be coming up with. If there is time I have three small groups present what they come up with for each and explain. Then I lead the discussion into how these relate to the unit circle. That will continue in my next post (we pull it all together in some ISN inserts).

SINE:


COSINE:


TANGENT:


Is this good math teaching? I hope so. I just remember when I first started teaching PreCalculus 10+ years ago. I was equipped with my previous learning as a precalculus student many many years previous and a bunch of textbooks. No real curriculum. When I got to inverse trig functions I had to ask myself - what are these really? What do I want to know about them? How can I make sense of them in relationship to everything else I know about mathematics? I have a hard time using problem sets in textbooks to drive my teaching. I like having a deeper understanding of how things work rather than just know how to solve given problems.

We do then go onto apply these ideas to problems. But I'd like to think of another way to assess understanding than just evaluate inverse trig functions. Maybe some writing prompt for the students to respond to.

All my files on Inverse Trig Functions can be found HERE (and this is everything - introduction sheets, evaluate sheets, ISN materials)

Monday, February 8, 2016

Graphing Trig Functions part 2


Next we spend time playing around with graphs of sine and cosine. I work on developing some "number sense" and use a somewhat intuitive approach to graphing by combining what we know about the characteristics of the graphs.

We do a bunch of examples together - do these in our ISN:


We do a lot of graphing with all sorts of variations on transformations. Before graphing we list the transformations and characteristics and use them to plan our graph space. I use the midline, amplitude and the period start & end to determine the boundaries of the "single period" of the new transformed function.  I like to show the parent function graph on the same graph too so we can see how it changed. We show one period but I continually remind them that this is only one of an infinite number of periods and we are just showing where the initial period from the parent [0, 2pi) ends up after the transformations.

Years ago I learned a cool technique of finding the start & end of a period when there is both a right/left shift AND some type of horizontal stretch/compression. We set up a compound inequality with the standard boundaries of 0 & 2pi. And we put the "argument" in the compound inequality. Then we solve the inequality. Which applies the two transformations to the boundaries of the standard period showing us where the new transformed period starts & ends. See my examples below. 

Here are two examples we put in our ISN. My files below have many other examples.


All my graphing trig functions files are HERE (everything - a bunch of lesson materials, ISN materials, etc). 

Sunday, February 7, 2016

Graphing Trig Functions part 1


The stage has been set! We've learned about angles as rotations, we've visualized trig ratios of those angles, we are thinking in radians and we've made a connection between the circular (Ferris wheels) and the sinusoidal shaped graphs. Time to get serious and do Sine, Cosine, and (for some variety) Tangent.

I start by drawing a circle on the board with students fill in for me the angles and the ordered pairs along each axes.

Then I set up a set of axes to go with this unit circle. The x-axis is the angle and the y-axis will be our trig values. I'm sure to use the language of "independent variable" and "dependent variable" to help them make the connection with function work they did back in Algebra One. I also ask them what the maximum sine value is and the minimum sine value (and thus the range).

From here I give each student group a whiteboard marker and one student from each group goes up one at a time and takes a point from the unit circle and marks its location on the coordinate plane. Starting with (0, 0) and rotating around to (2pi, 0). Then someone uses a marker to connect all the data points to make a nice smooth sinusoidal curve.

We do this again for cosine. Then we do something similar for tangent with very different results. With tangent we get to talk about what "undefined" looks like on a graph and how can we get more points (pi/4 is a good reference angle to use with tangent). I wish I had taken pictures of the students' work on my whiteboard. 

It was great to get them all out of their seats and being involved in the construction of the sinusoidal curves. They knew sine and cosine had these curved graphs but with this they could see how they were constructed.  *side note I have in the past tried more creative and involved ways to make the connection between the unit circle and the sinusoidal curve from use uncooked spaghetti to a simulation on the graphing calculator. But this simple "student out of their seats, everyone contribute" basic drawing approach is so nice and clear and concise. Not fancy but really does the trick!

After all this drawing and discussing students fill in a foldable for their ISN.

This is my fancy space saving four square fold. You can see above there are two on this page. The graphing one opens up showing two squares to this:


and then opens up to four squares to show this:


Students use our classroom experience to fill in these foldables in their small groups as I walk around and prod them along but mostly listen to really cool conversations about trig and graphing. 

Now since I have an 82 minute block I use about 15 minutes at the end to quickly review transformations and relate them a bit to these functions. I do this with a foldable that we also put on the graphing page. Another "modified" 4 square fold. Transformations should be review but they have some trouble with the horizontal stretch and compress action especially as it interferes with seeing the true nature of the right/left shifts if they occur in the same function.

the transformation unfolds to this "two square":
Which actually have four little vertical doors that we cut. And under each door there is information on what a, b, c & d represent. We don't have much time to talk about these and mostly students copy the information on the foldable as I display it with the document camera.

My textbook has some good basic problems that dabble with characteristics and transformations so I give them a bunch of those to work through.


All my graphing trig functions files are HERE (everything - a bunch of lesson materials, ISN materials, etc). 

Saturday, February 6, 2016

Introduction to Sinusoidal Graphs


Ever since I started teaching PreCalculus 10+ years ago I have used Ferris wheels to introduce sinusoidal functions. Well not real Ferris wheels, although that would be really cool. But the idea of them. And we do have a little discussion about Ferris wheels in general and it's interesting to see that there are a handful of students who just don't like them. huh.

Anyhow - way back when I started teaching PreCalculus I found in this book Functions Modeling Change (but an earlier edition) the Ferris Wheel approach. Very cool. 

So I start off the discussion with a few PowerPoint slides. The one you see above is projected as students come in. Then we use ...


I actually went on the London Eye about 5 years ago. Very cool. And sometimes I have a student in my class who has been too.

Then I tell the class - okay make a graph of the height of a person on the Ferris wheel with respect to the time (in this case minutes). They work in their small groups and come up with nice sinusoidal graph. Wish I had taken pictures from my whiteboards of what they came up with. 

From here we have a discussion of periodic and sinusoidal graphs. We define those terms. we talk about characteristics and students work with more Ferris wheel scenarios. We look at some variations in the location and the height of the loading platform. Of course times and diameters change too. It's a great way to get students to think sinusoidally, relating to something they have experience with.

We use this foldable in our ISNs for periodic functions:

The four doors on the bottom two-thirds of the foldable open up:


After students do a bunch together (we have 82 minute blocks) we summarize with this example on an ISN foldable. I have students do the front and the second inside page.


The next class we focus on finding the height at certain times. This can be very confusing and difficult for students but I like how it pulls in the circle and some trig (we stay in radians). We usually end up doing a whole block of problems I make up for various Ferris wheels.


All this preliminary work gets students ready to work with the more abstract and general sine and cosine graphs.

All my graphing trig functions files are HERE (everything - a bunch of lesson materials, ISN materials, etc). 

Wednesday, February 3, 2016

Mixture Problems in Algebra One

This intiative by #MTBoS has been great - I've been better about blogging and visually documenting what I do in class.  And it's been great fun to read other blog posts on the weekly initiatives. This latest directive is to blog about a lesson. This is mostly what my blog is about - blogging on lessons I do and the interactive student notebook materials I use/create. 

Teaching mixture problems using systems of equations can be challenging because it can be difficulty to visualize what they are about. I'm all about visualizing and understanding concepts (for myself and for my students). This lesson sets the stage for building understanding about the concepts underlying mixture problems.

The class is Algebra One, honors level, ninth grade. We've been working with systems of equations for about a week and a half now. Students learned about systems last year in 8th grade, mostly focusing on solving systems using graphs. I started this unit by focusing on creating models for situations with two conditions and two unknowns (see this blog post). We then learned how to solve the algebraic models without graphing and I incorporated applications problems as I went. Mixture problems are their own little category of applications though, so I introduce those separately.

This year I decided to introduce mixtures visually with something all students love - cereal! Last year my student teacher and I talked about this idea and she implemented it in her classes (thank you Tess!) so I took her good work and tweaked it a bit for my class this year. 

I set up a little "Research & Development Lab" in the back of my classroom:

Those ziploc bags each hold an ounce of the labeled cereal (about a heaping cup of each).

And provided some facts that our research team is using:

The question was how many ounces of each type (Kix & Cocoa Puffs) would have to be in this blend to achieve the size and cost we are aiming for? Students saw that this was a situation with two unknowns and two conditions. So it was time to organize this information into a system of equations (all this comes from student responses):


The tricky bit of course is in setting up the equation that represents the cost. Students have to remember that the sum represents the cost of each individual type of cereal (cost per ounce times number of ounces) so that must be equal to the cost of the new cocoa kix cereal box (cost per ounce times the total number of ounces in our prototype box).

Once we got this all set up students solve the system. Now the fun part - we actually measured out a "box" of this special blend together.  And then students got to sample the cereal (yum). I gave everyone a small cup full of the cereal to munch on.


So how did this work? Well it was certainly fun and I have a bright bunch of kids this year so they were able to create the system pretty easily. I handed out the cereal samples for students to munch on while we did some problems together  but there were only 10 minutes left to class and I think everyone was too excited snacking to really think about any more problems. I started to work on an ISN foldable looking at different types of mixture problems but gave that up pretty quickly. Instead I gave them two problems to try for homework and figured the next day we would pull things together.

DAY #2 on Mixtures

Before I went over homework and got any feedback from students I had them work in small groups at the board on mixture problems similar in nature to what we did in class with the cereal. After the group solved theirs they had to switch and analyze the solution and work of the problem next to theirs.


This worked really well and students said they were understanding mixture problems better.

Then we focused on mixture problems that contain percents (including interest problems).

After that we used our ISN to summarize our learning with the left page containing a foldable showing 4 examples that the students set up systems for...


(inside bits here:)


and the right page solving those systems.


All files used in this lesson (worksheets, board problems & ISN foldables) can be found HERE.