Showing posts with label PreCalculus. Show all posts

Saturday, August 5, 2017

Solving Trig Equations Part Two


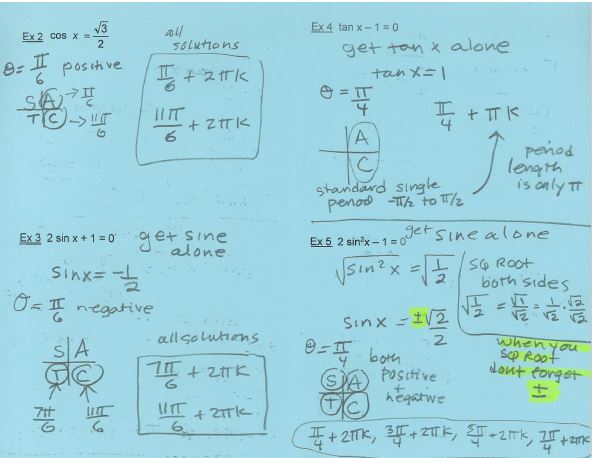
I find that my students have a very difficult time with solving trigonometric equations. Part of this stems from weak algebra skills. This is frustrating because these are students in an honors level Precalculus class who have successfully completed honors level Algebra One and Algebra Two. Perhaps it is because it is "out of context". Which is not a good excuse as it shows me they didn't learn conceptually what it means to solve an equation (and what those algebra skills, such as factoring, are really about).

So I start solving trig equations in the introduction unit on trig. The focus of that chapter really is understanding trig functions and the trig ratios that correspond to various angles (having learned right triangle trig in Geometry & Alg 2). 

Then we see solving trig equations again in the Analytic Trig unit - where we also simplify and verifying trig expressions using various identities (and algebra techniques). Later we solve equations in this same unit using more complex sum & difference and multiple angle identities.

This blog post looks at solving trig equations including basic trig identities. We work on these right after we spend a few days on the basic identities (reciprocal, quotient and Pythagorean) and simplifying trig expressions. The important thing for my students is to practice. So many of my ISN pages are examples. I have students do these together in their small groups and we share work in the larger group setting.

I usually introduce this section with a few complicated equations that I ask the small groups to solve. I remind them of what we did last unit and that so far in this unit we have some new tools available to use (those previously mentioned identities - it's a good idea to ask students to share what new tools we have and get feedback from class before they solve). After we do this introduction work (solve, share, discuss). I give them the information sheet for their notebook (see above). 

Then we dive into doing examples Some we do together, some we do in small groups. Ten examples in all. 


Now this year a student got confused with "solving trig equations" and "evaluating inverse trig functions". They thought they were the same thing and got stuck in thinking about the limited domain & range for inverse functions. I was like "uh-oh" - we discussed that misconception. Then next class I gave them this foldable to summarize our conversation:


Since I had a page opposite that little addition in our ISNs, I gave students another solving example for a warm up for the blank page:
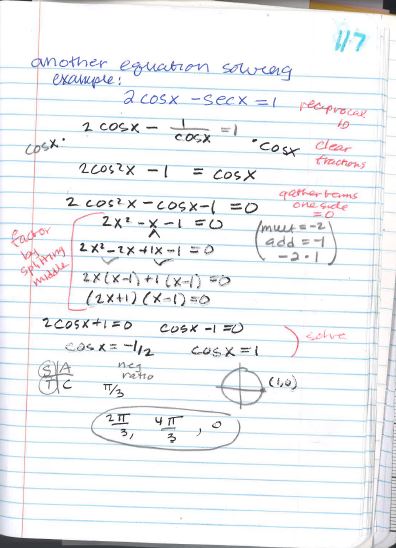

In retrospect, I will save some paper this coming school year by having students do those 10 original examples directly into their notebooks. A composition notebook does have 200 possible pages and this year in PreCalculus we used only 147 pages. 

My files on equation solving can be found HERE.  These include the two ISN pages and a summary practice sheet of examples. 


Thursday, July 20, 2017

Solving Trig Equations part one revisited


I've already blogged about solving trig equations in a previous post found here. I've updated my lessons a bit by redoing the inserts for my ISN. This blog post shows the updated inserts. See the previous post for more details on the actual lesson.


inside that foldable:

Once again a review of some basic algebra skill is necessary and then they are applied to trig equation solving.


Students then work through a few practice examples:


All my equation solving foldables can be found HERE. You'll also see some worksheets of equation solving problems and answer keys.


Wednesday, July 19, 2017

Inverse Trig Functions Revisited


I'm updating my Inverse Trig Functions post because I updated my ISN pages in the 2016-2017 school year. I still like my introduction information found at this original blog post.

We still explore the various inverse trig functions using our graphing calculator (love the draw inverse option in the DRAW menu). From there we summarize our findings with three ISN pages for each of the big three trig functions. (I've veered away from doing as many foldables in my precalculus ISN - we have lots of room so don't need to conserve space with folding inserts).


From there the discussion heads towards how to evaluate inverse trig functions. The key word here is "functions". So we have to look at the domain & range restrictions of the inverse functions when determining what angle we have.

I have these two pages - the yellow is a flap over the white notebook page (hmmmm what did I just saw about not using foldables - but it makes sense to do it here). We do the white page first to consider and discuss how to do the evaluations in a general way with a few guided examples. Then students do the yellow page for independent/group practice as I circulate around the room.


From there we go into "double evaluations". I am able to get to all of this because we have an 82 minute block schedule. I usually start off by showing a few on the board so they can see what I mean by "double". I like to show at least one where the function and inverse "cancel" out  and one where they do not (see first two examples on white page 95 - something like those two). Because of the restrictions we cannot always assume that a function and its inverse will "cancel".

So after a bit of discussion we summarize how to "double evaluate" on this page with a few examples to do together.


At this point I usually do run out of time. So I assign a few problems in our textbook which mostly focus on the single evaluate. Then in our second class I use this insert as our warm up:

After discussing any questions students have on their homework (and maybe a basic homework quiz) they work in their small groups on a summary worksheet of many different inverse evaluations and double evaluations. You can find my worksheet in the files for this topic.

All files for inverse trig functions can be found HERE.


Friday, June 16, 2017

PreCalculus: DeMoivre's Theorem and Calculating Roots of Complex Numbers

http://mathforum.org/mbower/johnandbetty/p30/p30.htm

The next lesson after trigonometric form of complex numbers is working with DeMoivre's Theorem. We calculate powers of complex numbers and then from there look at different roots of complex numbers.

Most of my classes start with a Q & A on the last lesson and then a POD quiz (problem of the day quiz) based on the last lesson. Something quick to assess understanding.

I have found that a good way to start this new lesson is to give them a complex number and ask them to square it. (something like -2 - 2i ). Most students can do this pretty well using the distributive property or the box method of multiplying binomials. But then I ask them to raise the same complex number to the 6th power. Since we didn't get to the binomial theorem this year they have no real idea what they could do except keep multiplying. An overwhelming prospect. This sets up some reasonable rationale for today's DeMoivre's theorem. I go through raising it to the 6th power using this new "formula". So much easier!

I use the following foldable and examples in our composition notebooks (ISNs). 

DeMoivre's Theorem


Then we switch gears to the inverse - what's the inverse of raising a number to a power? Taking roots. I begin this discussion by asking, "What is the square root of 64?". Being an honors class they easily remember there are two square roots, BOTH 8 & -8. Then I asked what is the cube root of 8? Another easy one, 2. But then I tell my students that there are TWO MORE cube roots. And that the number of roots is always equal to the index "n". However some roots might be in the set of complex numbers. 

We look back at example 2 in our last set of examples. The original complex number was raised to the 12th power and the result was 4096. Another 12th root of 4096 is 2. But we started with a complex root in our previous example. We talk about what the other roots look like (there is one more real 12th root in this problem...).
From there we set up our new formula:

Nth Roots of Complex Numbers

We go through an example very carefully. Notice the foldable tapes on the side of this notebook page and when you lift the flap you see the steps we follow. (a note here on taping in foldables - tape it both on top and then lift it and tape it under to secure it well in the notebook). 


Students start to notice a pattern in the angles of these roots. I use this opportunity to look at the roots on a unit circle and students see how they are evenly spaced. Cool stuff!

Since this is our last topic for the year we overflowed a bit onto a few more pages.... 


All my foldable files are found here and a worksheet of this mini unit can be found here.

Tuesday, June 13, 2017

PreCalculus Series 2017

http://study.com/academy/lesson/what-is-summation-notation.html

After we spend a day on reviewing sequences we jump right into series. I'd love to cover it all in one 82 minute block. But we start the class by going over homework problems and then I have a POD (problem of the day homework quiz) so we usually have to finish up infinite series on the next day. (More on my PODs and homework policies on an upcoming blog post).

Of course, we start Series by defining them. I use a Frayer diagram:

I have students trim this one a bit so we can glue it into our composition notebook with the orientation shown. That way I have a little room on the bottom for the graphing calculator method of calculating a series. I only let them use this for checking. They have to use other methods to actually calculate the series (as will soon be shown on this blog).

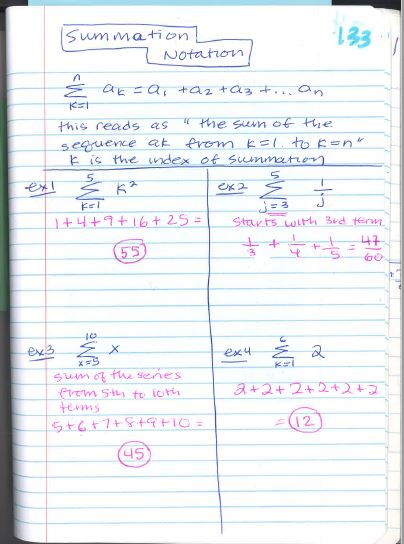
On the page opposite the definition, we do a page on summation notation.

Before I start the formulas for series, I tell the famous Gauss story about adding up the numbers one through 100. If you don't know the story, check out this link (or any other page on the internet that you might when you search this story). I like the link I gave because it references the introduction page for the coolmath lesson on arithmetic series. I LOVE her page and she does a  nice job at this link (if you continue to subsequent pages) of developing the formulas. (BTW here is the link for her approach on the whole topic of sequences and series, definitely worth a read through!)

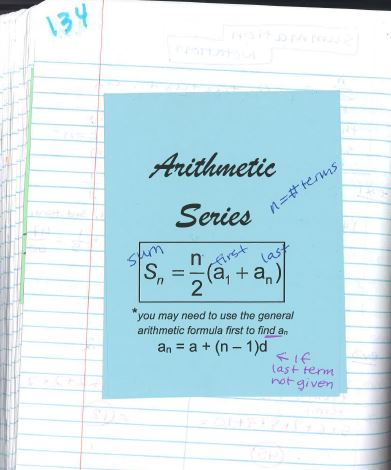
After we do the "trick" young Gauss used I use that to develop the formula. We fill out a foldable on the Arithmetic Series formula. 

Lift the flap up and this is what you will see inside this foldable:

On the page opposite, I include some examples for students to work through. This is pretty quick. We don't have to work through them together. They work on them and I walk around and check answers.


There is no cute little story to help my students remember the Geometric Series formula. But fortunately we do have a formula. I introduce that with my foldable.

Lift the foldable flap and you see see the formula and what it's all about.

And again, we have a page of examples on the page opposite. The bouncing ball example is a tricky one!


Finally I do some intro-stuff on the sum of an infinite series. I write two infinite series on the board (the first 4 or 5 terms of each, one with |r|>1 and the other with |r|<1). We talk about what it would look like if we added the terms in the sequence - as many as we can anyhow. Students pretty quickly see that the one with |r|>1 just gets larger and larger. But the one with |r|<1 they are not so sure on. So we work with the graphing calculator way to add series. And we find the sum of the first 10 terms. Then the first 20 terms, then 50, then 100, then 150, etc. Usually by the 50th term we get the sum it converges to. So we talk about what this means. I take the finite Geometric Series formula and ask them what happens when n = infinity? What happens to the formula? This helps them to see how the infinite formula is derived from the finite formula. It's pretty cool to talk through it rather than just give them one more formula to memorize.

Here is my foldable on the formula:

and on the page opposite we have some examples:


Now this school year (2016-2017) this was all I could do with Discrete Math. So the rest of the "overflow" block that I had to use the first bit for infinite series I gave the students a review sheet to practice problems on sequences and series. Then we had a quiz the next day.


Monday, June 12, 2017

PreCalculus Sequences 2017


https://risesa.wordpress.com/tag/foxtrot/

We end the year in PreCalculus with two mini-units. This is the first lesson in the first mini-unit "Sequences & Series". is on sequences. Students learned about sequences in Algebra One (many courses ago) and learned the general formulas. We apply those formulas a bit more and then progress to series. When we have time we do a full unit on "Discrete Mathematics" which includes combinatorics (permutations & combinations), binomial theorem and probability. But this year we were running short of time. The Calculus teachers wanted us to be sure to get to series and summation notation - thus the inclusion of this mini unit!

Back to sequences.


I start the lesson at the end of the last unit test. As they finish the test, students take a sequences review sheet that reminds them of the preconcepts they had learned in Algebra One.

We start the actual lesson with a frayer diagram on sequences.

Then we defined each of the types of sequences with this foldable. Inside the foldable you will find the details.


I did include a "neither" category because Fibonacci sequences are very cool and the sequence of perfect squares is pretty common yet is neither arithmetic or geometric.

Next we reviewed the arithmetic and geometric sequence formulas. I do like to spend a little time showing how each formula relates to example. I like them to see how the arithmetic involves the repeated addition of the common difference (thus appears as multiplication in the formula) and the geometric involves repeated multiplication of the common ratio (thus appears as a power in the formula). I use this foldable to summarize  the formulas.


Inside there are examples.


I like my precalculus students to apply these formulas in constructing sequences also. These problems involve creating a system of equations using the general formulas. The geometric one is interesting because you solve that system using division, not a typical operation used in solving systems of equations.

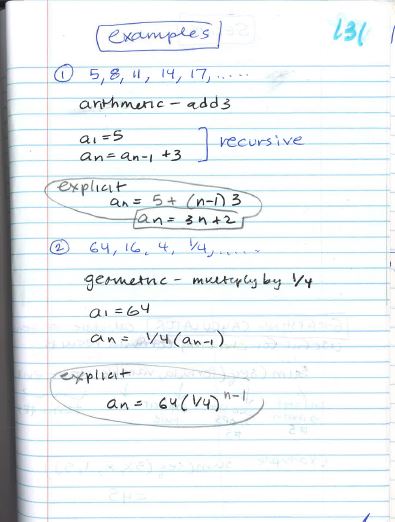
Finally if I have time (we do have an 82 minute block) I like to do a quick comparison of explicit versus recursive rules. The focus in this course is the explicit rules but recursive rules are useful, especially in computer programming. These pages show my overview.


I like to use our TI 84 graphing calculators to experience the recursive rules too. We go through an arithmetic sequence - first we type in the first term (let's use 8) and press enter. This will give you the first term and establishes the first term in your calculator. Then we type the rule (let's say d = 5, so they would type +5). That establishes the rule in your calculator.  And it will give us the second term. With those two steps the recursive formula has been programmed into your calculator. Now you can use this recursive program to generate additional terms. Each time you press enter you will get successive terms starting with the third term.

For homework, I give my students examples in our textbook to complete.

Here is the folder on box.com that contains the ISN masters for both sequences & series.